


Evening everyone and welcome back to our blog. It's Jade here. As you can see by today's blog post I will be showing you how to make some super easy Halloween themed treats. It's nearly the 31st of October here in the United Kingdom which means we're super close to Halloween. So I thought it would be a great idea to bake some treats for a Halloween party or even just for yourself.
Ingredients:
45 grams of butter
300 grams of mini marshmallows
180 grams of Rice Krispies
Green Food Colouring
2 bars of chocolate ( any brand is fine, I used Galaxy)
Tube of white icing
A mini bag of white chocolate buttons

Method:
Firstly you will need to melt the butter on a low heat
Then once all the butter has fully melted and there are no more lumps, add the marshmallows into the pan on the heat. Constantly stir them so that they don't burn at the bottom of the pan and stick.
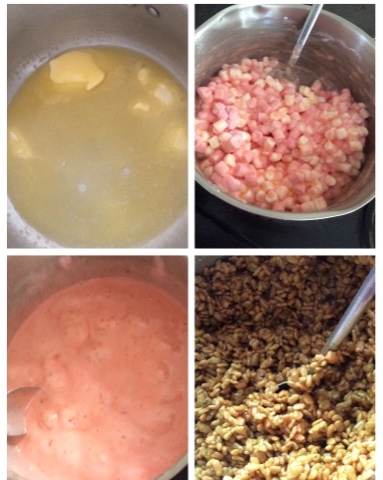
After that take the pan of the heat, immediately add the Rice Krispies. Add as much green colouring as you want, I used a full bottle but it actually didn't turn out as pigmented as I wanted it. So bare that in mind. Stir them well until the mixture leaves the side of the pan.
Then get a 32cm by 23cm tin and line it with baking paper. Then press the mixture firmly into the tin and make sure the top is flat.
Place the tin into the fridge and leave it to set,
Once the mixture has set you will need to cut them into even squares. It depends on how big you want them to be. I cut out 12 so they were a big size to decorate more on but you could cut smaller if you wanted to.
You will need to boil a kettle and once it has boiled pour it into a large glass bowl. Place a slightly smaller bowl inside the bigger bowl and add your chocolate. Keep stirring the chocolate until it has fully melted.

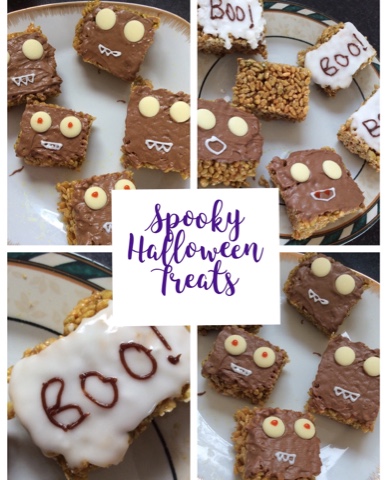
Spread the chocolate onto the top of the Rice Krispie squares and make sure it's even. You then want to add the white chocolate button eyes on before the chocolate fully sets. After the chocolate has set you can use your white icing to draw silly faces on them.
Then they are ready to serve.

In the picture you can see that there are some white ones. They were a last minute idea and all I did for them was make some white icing using icing sugar and water. Then I spread it on the top like I did with the chocolate. Then after it had dried I used a black icing tube to write the word 'Boo!'. I liked these as I thought it separated the chocolate ones apart.
I hope you enjoyed this blog post and the recipe has come in useful for you. If you manage to recreate these Halloween treats let us know by sending your pictures to our Twitter which is @2peasinapodblog
Hope you have a lovely week and you enjoy Halloween this Monday coming.
Also we would just like to thank everyone who entered our giveaway. We would like to say a big well done to Alice who won. We used rafflecopter which at the end of the time it randomises all of the entered and picks out one. So it was Alice's lucky day. Again thank you to all that entered and please don't be dis heartened as we will be doing plenty more giveaways in the future.
Please Share The Pea Pod Love,
Thank You,
Jade Xx
Coconut Lane Discount Code: peas20
Where To Find Us:
Click The Usernames For Direct Links
Blog Accounts:
Twitter: 2peasinapodblog
Email: twopeasinapodblog@gmail.com
Jade:
Twitter: Dewey_bear
Instagram: THE_PERKS_OF_BEING_JADE
Lydia:
Twitter: Lydia_Greyhound
Instagram: LYDIA_GREYHOUND


No comments:
Post a Comment