Showing posts with label Halloween. Show all posts

23 October 2018

Bewitched Bubble Bar Lush Review


With Halloween lurking around the corner, it only seemed fair to purchase some spooky bath treats! One thing that caught my eye whilst I was browsing the selection in Lush the other day was, this cute cat! This bubble bar is limited edition and has been brought out for Halloween. 

The first thing that drew me to this particular bubble bar was the cute design! I am such a sucker for an animal themed bath bomb or bubble bar! I then smelt it and oh my god! It smelt so good! The spicy woody scents were divine! 


This is what the Lush website says "After a busy day whizzing around on a broomstick, run a bath, crumble this lucky little cat under the water and ground yourself with spicy olibanum. Let superstitions go and allow yourself to be spellbound by uplifting bergamot oil as your twitch your nose and breath in this familiar blackberry scent. Whether in this life or one of the other eight, you'd be a fool to let this pass you by!" - Which I could not agree more. 

When it came to actually using it, I decided to use the whole bar at once! I mean why not? I usually sparingly use my bubble bars but I guess you could say I felt adventurous! The first thing that surprised me was it made the water go jet black. I really liked that, made it dark and mysterious. The amount of bubbles it produced was great as more bubbles the better. 


Once in the water, it was sparkling with subtle glitter bits. I liked that. The bar made my skin moisturised and the bergamot oil was in use! I definitely would recommend this bubble bar to people. If I pass a Lush store again before they go, I will be buying another one! I would rate it a 9/10 ! 


Thank You,

Jade 

Where To Find Us: 
Click The Usernames For Direct Links 

Blog Accounts:
Twitter: 2peasinapodblog
Email: twopeasinapodblog@gmail.com

Jade: 

Lydia:

Instagram:   LYDIA_GREYHOUND


16 October 2018

Halloween Inspired Cookie Cake


With Halloween lurking around the corner we thought it would be apt to create a Halloween inspired recipe! Two of our favourite foods are cookies and cakes! So why not mash them together? We have a recipe for a cookie cake!


To begin with, you are better off to weigh out all your ingredients. You will need:


  • 12 Tablespoons butter, melted
  • 1 cup brown sugar, packed
  • 1 large egg
  • 1 egg yolk
  • 2 teaspoons vanilla extract
  • 2¼ cup all-purpose flour
  • ½ teaspoon salt
  • ½ teaspoon baking soda
  • ½ cup mini chocolate chips + more


For the icing: 
  •  4 Tablespoons of butter     
  •  5 Tablespoons of icing sugar
  •  2 teaspoons of vanilla extract
  •  3 teaspoons of orange food dye
  •  Halloween decorations


After you have weighed out your ingredients, preheat oven to 200 degrees. 

Then line a 12-inch pizza pan with greased parchment paper. Set aside.


In a large bowl cream together melted butter and brown sugar. 

After that mix in eggs and vanilla extract.

In a separate bowl whisk together flour, salt and baking soda.


Then add dry ingredients to wet ingredients, stirring until a soft dough forms.

Fold in mini chocolate chips and pop the dough into the pan.

Bake for 13-15 minutes. (do not over bake. Remember cookie will continue to cook as it cools)


Let cookie cool on pan until completely cooled... to which by the pictures we did not do!! This part of the recipe is crucial! But, were going to roll with it and say it is all gooey to look spooky. 

Whilst the cake is cooling, mix the icing ingredients together and decorate your cake as desired. 


This cake can be for any time of the year! However you would like to decorate it, is how the cake will fit with your festivities!! Hope you liked this recipie! What is your staple Halloween baking recipie? 


Thank You,

Jade & Lydia 

Where To Find Us: 

Click The Usernames For Direct Links 

Blog Accounts:
Twitter: 2peasinapodblog
Email: twopeasinapodblog@gmail.com

Jade: 

Lydia:

Instagram:   LYDIA_GREYHOUND


9 October 2018

D.I.Y Halloween Decorations

Hello It's 2 Peas In A Pod Blog Here!


Hello everybody, welcome back to our blog. Today's blog post is by Lydia. We're already in October, I think this year has gone so quickly! So, as its October, that means halloween is approaching. As it's coming up to halloween I thought it would be good to do a D.I.Y halloween decorations blog post. So, without further ado, let's get onto the blog post.

For this, I have 2 handmade Halloween decorations, that are really easy to make and look great. The first one is these glowing eyes. I've seen these before for ages and they looked awesome. I wanted to try them when I first saw them, and what better time to do them than halloween. These are better outside, obviously when dark. But would also look good inside!


They are really simple to make, all you have to do is get the cardboard middle bit from toilet rolls or kitchen rolls, put holes as eyes in them, then snap the glow sicks so they glow and put them into the cardboard toilet roll bit. It probably would've been better if I could find bigger glow sticks, but I just got these ones and they worked okay.

The second D.I.Y Halloween decoration I have is spiders in their cobwebs. This is another really simple one, all you need for this one is cotton balls and plastic spiders. The cobwebs are made from the cotton balls, to make them like cobwebs, what I did was pulled them out a bit so they're thinner and look more like cobwebs, then I added the plastic spiders to complete the look.


These halloween decorations are really easy to make, plus they look great! They are 2 of the simplest decorations to make, perfect for people that don't have a lot of time. they're simple but effective.

Anyway, that's the end of this blog post. I hope you enjoyed reading this blog post, and maybe its given you ideas for any Halloween decorations you plan on making for the Halloween season! Thank you for reading and I hope you enjoyed!

Please Share The Pea Pod Love,

Thank You,

Lydia Xx

Where To Find Us: 

Click The Usernames For Direct Links 

Blog Accounts:
Twitter: 2peasinapodblog
Email: twopeasinapodblog@gmail.com

Jade: 
Twitter:   Dewey_bear

Lydia:
Twitter:  Lydia_Greyhound 
Instagram:   LYDIA_GREYHOUND

17 October 2017

Keeping Your Dog Safe On Halloween

Hello It's 2 Peas In A Pod Blog Here,

Happy Halloween everyone! I guess it's a week away but the celebrations have already begun! As you will all know myself and Lydia are big dog lovers and we actually have dogs ourselves. We both have greyhounds. This time of year is when it starts to become hectic! We need to make sure that we don't leave our dogs behind. We may be having fun from the Halloween festivities but we need to make sure our pets are happy and content too.


We recently came across the website PuppySpot and their Halloween safety graphic which inspired us to spread the word on how to keep your 4 legged friends safe this Halloween. For those who aren’t familiar, PuppySpot is an online service committed to helping loving families find their perfect puppy.

The first tip we would like to give you is to make sure you aren't giving your dog 'Frightful Foods'. So there is the obvious don't feed them chocolate. Theobromine that is found in chocolate is toxic to your dog and can be very harmful to the insides of your dog. So when you are handing out your treats at the door to trick or treaters, make sure you don't leave them on the side. Keep them out of reach of the snouts! Keeping on the same lines of treats being handed out sweets also contain xylitol sweetener which again can cause illnesses to the dogs.  The candy bowl is for the trick or treaters not the dog-bone eaters!


Another thing to consider this Halloween is creepy costumes. If you plan to dress your dog in a Halloween costume, make sure they are 100% comfortable in it. They might stress in it so a tip is to try it on a few times before Halloween to make sure they are comfortable. Try a bandana it is simple and stress-free for your dog. Avoid costumes that can affect the dogs breathing and vision.

House parties are something I would like to make everyone aware of. Please don't host a party with your pets there. Some pets might start to feel uncomfortable with many guests in your house and especially the nervous dogs. So if you plan on hosting a party make sure your dog is somewhere in a stress-free zone with some toys and long-lasting treats to keep them occupied. Another thing is they might feel uneasy seeing many scary costumes and not being able to recognize peoples faces. Please put your pets first.


When it comes to decorating your house all spooky. Make sure all wires and chords from fairy lights etc are tucked away and are out of reach from the dogs. Try to avoid glow stick products as the liquid is toxic to your pets and will harm them.


Well, that's all the tips that myself and PuppySpot have to offer. Halloween should be a treat for your pup, so make sure you both have a good time! I hope you have appreciated the pictures in this blog post they are of Bosco who is my pooch and Amy who is Lydia's dog. We will also be tweeting a PuppySpot picture with these points mentioned, feel free to save this picture and share it about on social media to spread the word of keeping our dogs safe this Halloween. Thank You for taking the time to read this blog post I appreciate it so much.

Please Share The Pea Pod Love,

Thank You,
Jade Xx
Where To Find Us: 

Click The Usernames For Direct Links 
Blog Accounts:
Twitter: 2peasinapodblog
Email: twopeasinapodblog@gmail.com

Jade: 
Twitter:   Dewey_bear

Lydia:
Twitter:  Lydia_Greyhound 
Instagram:   LYDIA_GREYHOUND


10 October 2017

Evening Routine - Halloween Edition

Hello, It's 2 Peas In A Blog Here!


Hello Everybody! How are you all today? It's the countdown to Halloween, so what better way to celebrate it then with a blog post to go through a perfect Halloween evening. We are very excited for the spooky evening. So we decided to create this blog post on how our evening will roll out. This is how we would spend an evening on the lead up to Halloween, from a movie to chocolaty treats.


The first thing we love to do to start our evening is light a candle! This candle smells amazing! It's Cranberry and Orange, it's the perfect smell for this time of year and leading up to Christmas! It smells very fruity and autumnal. We've not seen many Halloween themed candles, so if you guys know of any please recommend them to us.


Then we stick on a film. The film chosen for our evening is Ouija, it's a really good film. Not totally scary but has a couple of jump scares! You just have to have a movie on, even if it isn't scary, for example, you could have 'Shrek; Scared Shrekless'. It's a perfect movie for a Halloween family evening! Lydia, has always loved the film since she was younger! It has to be Halloween themed though.


When you're watching the film, you have to have a sweet treat, for our evening we had Halloween chocolate balls, perfect for snacking on, and also Pumkin Patch cakes and Eerie Eyeball Teacakes. Or, if you're don't have a sweet tooth like us, you could have a savory snack. Shops have a lot of delicious Halloween themed savory snacks. As it is Halloween the shops are stacking their shelves with loads of themed treats. So definitely have a look for them.


Whilst you are snuggled up on the sofa with a cozy blanket and your sweet treats it is time to get a warm cozy drink. This could be from tea, coffee or our choice hot chocolate. This is the best, Jade's favorite is white hot chocolate but this evening we opted for normal milk hot chocolate.

So, that is the end of this blog post! We hope you have enjoyed reading. We loved having the Halloween evening, with all the sweet treats and a great movie. Thank you for reading our blog post, we hope you enjoyed this. Maybe we have given you the idea to do a Halloween evening with your friends or family.

Please Share The Pea Pod Love,

Thank You,

Jade & Lydia Xx

Where To Find Us: 

Click The Usernames For Direct Links 

Blog Accounts:
Twitter: 2peasinapodblog
Email: twopeasinapodblog@gmail.com

Jade: 
Twitter:   Dewey_bear

Lydia:
Twitter:  Lydia_Greyhound 
Instagram:   LYDIA_GREYHOUND


3 October 2017

Monster Brownies

Hello, It's 2 Peas In A Pod Blog Here!


Hello Everyone! Welcome back to our blog. Today's blog post is by Lydia and is a recipe! September flew by and now we're in October, and as we are, it's only right for there to be a Halloween baking blog post here on our blog! I made these 'Monster Brownies' the recipe is essentially a normal brownie recipe, just the decoration on them makes them perfect for a Halloween party! So, lets get on with this blog post.


Ingredients:
  • 185g unsalted butter,
  • 185g dark chocolate,
  • 85g plain flour,
  • 40g cocoa powder,
  • 50g white chocolate,
  • 50g milk chocolate,
  • 3 large eggs,
  • 275g caster sugar.
Decoration Ingredients:
  • White chocolate,
  • Edible eyes.
Method:
  1. Cut 185g unsalted butter into small cubes and put into a medium bowl. Break 185g dark chocolate into small pieces and put into same bowl.
  2. Fill a small saucepan (Quarter full) with hot water, put bowl on top so it rests on the rim of the pan. Put on a low heat until butter and chocolate have melted, stirring occasionally. Remove bowl from pan. Leave the melted mixture to cool to room temperature.
  3. Turn the oven on to 160°C (Gas mark 4), and grease and line your tin.
  4. Tip 85g plain flour and 40g cocoa powder into a sieve held over a medium bowl, make sure to get rid of any lumps.
  5. Chop 50g white chocolate and 50g milk chocolate into chunks on a board.
  6. Break 3 large eggs into a large bowl and tip in 275g caster sugar. With an electric mixer on maximum speed whisk the eggs and sugar. They will look thick and creamy. This can take 3-8 minutes, depending on how powerful your mixer is.
  7. Pour the cooled chocolate mixture over the eggy mousse, gently fold together with a rubber spatula, get all of the mixture from the sides by doing a figure of eight, moving the bowl around each time.
  8.  Hold the sieve over the bowl of eggy chocolate mixture and resift the cocoa and flour mixture, shaking the sieve. Gently fold in the powder using the same figure of eight action as before. then stir in the white and milk chocolate chunks until they're dotted throughout.
  9. Pour the mixture into the prepared tin, scraping every bit out of the bowl with the spatula. Make sure the mixture is even, and put in the oven. Set a timer for 25 minutes, when the timer goes off, open the oven and shake the tin, if it wobbles in the middle, its not quite done-so put in back in the oven for a few minutes.
  10. Once the brownie is cooked take out of the oven and leave to cool. Once its cooled then cut the brownie into squares, as many as you like.
  11. Then melt the white chocolate for decoration.  Drizzle the melted white chocolate over the top of the brownies. Then add the eyes. And enjoy! You could add more decorations but I just stuck to the white chocolate and eyes!
Well, that's the end of this blog post! I hope you enjoyed this blog post. Let us know through twitter if you made these! We would love to see them! Thank you for reading.

Please Share The Pea Pod Love,

Thank You,

Lydia Xx

Where To Find Us: 

Click The Usernames For Direct Links 

Blog Accounts:
Twitter: 2peasinapodblog
Email: twopeasinapodblog@gmail.com

Jade: 
Twitter:   Dewey_bear

Lydia:
Twitter:  Lydia_Greyhound 
Instagram:   LYDIA_GREYHOUND

24 October 2016

Spooky Halloween Treats

Hello It's 2 Peas In A Pod Blog Here, 

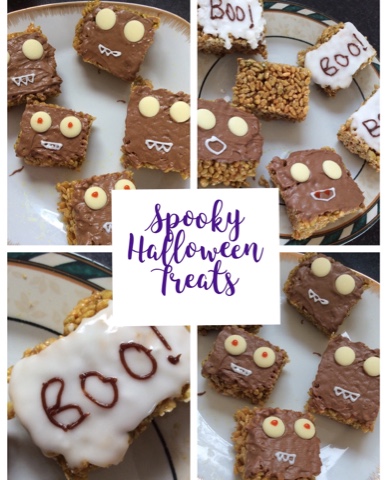
Evening everyone and welcome back to our blog. It's Jade here. As you can see by today's blog post I will be showing you how to make some super easy Halloween themed treats. It's nearly the 31st of October here in the United Kingdom which means we're super close to Halloween. So I thought it would be a great idea to bake some treats for a Halloween party or even just for yourself. 


Ingredients:

45 grams of butter
300 grams of mini marshmallows 
180 grams of Rice Krispies 
Green Food Colouring 
2 bars of chocolate ( any brand is fine, I used Galaxy) 
Tube of white icing 
A mini bag of white chocolate buttons


Method: 

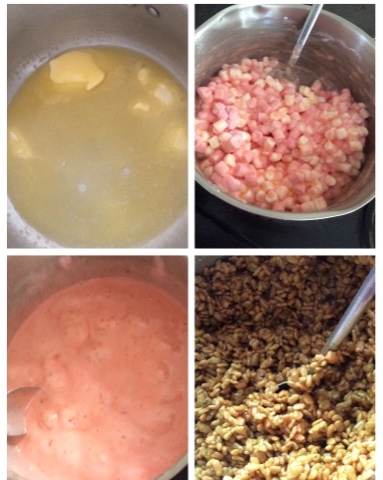
Firstly you will need to melt the butter on a low heat

Then once all the butter has fully melted and there are no more lumps, add the marshmallows into the pan on the heat. Constantly stir them so that they don't burn at the bottom of the pan and stick. 


After that take the pan of the heat, immediately add the Rice Krispies. Add as much green colouring as you want, I used a full bottle but it actually didn't turn out as pigmented as I wanted it. So bare that in mind. Stir them well until the mixture leaves the side of the pan.

Then get a 32cm by 23cm tin and line it with baking paper. Then press the mixture firmly into the tin and make sure the top is flat. 

Place the tin into the fridge and leave it to set,

Once the mixture has set you will need to cut them into even squares. It depends on how big you want them to be. I cut out 12 so they were a big size to decorate more on but you could cut smaller if you wanted to.

You will need to boil a kettle and once it has boiled pour it into a large glass bowl. Place a slightly smaller bowl inside the bigger bowl and add your chocolate. Keep stirring the chocolate until it has fully melted.


Spread the chocolate onto the top of the Rice Krispie squares and make sure it's even. You then want to add the white chocolate button eyes on before the chocolate fully sets. After the chocolate has set you can use your white icing to draw silly faces on them.

Then they are ready to serve. 


In the picture you can see that there are some white ones. They were a last minute idea and all I did for them was make some white icing using icing sugar and water. Then I spread it on the top like I did with the chocolate. Then after it had dried I used a black icing tube to write the word 'Boo!'. I liked these as I thought it separated the chocolate ones apart. 

I hope you enjoyed this blog post and the recipe has come in useful for you. If you manage to recreate these Halloween treats let us know by sending your pictures to our Twitter which is @2peasinapodblog
Hope you have a lovely week and you enjoy Halloween this Monday coming. 

Also we would just like to thank everyone who entered our giveaway. We would like to say a big well done to Alice who won. We used rafflecopter which at the end of the time it randomises all of the entered and picks out one. So it was Alice's lucky day. Again thank you to all that entered and please don't be dis heartened as we will be doing plenty more giveaways in the future. 


Please Share The Pea Pod Love,

Thank You,

Jade Xx

Coconut Lane Discount Code: peas20

Where To Find Us: 

Click The Usernames For Direct Links 

Blog Accounts:
Twitter: 2peasinapodblog
Email: twopeasinapodblog@gmail.com

Jade: 
Twitter:   Dewey_bear

Lydia:
Instagram:   LYDIA_GREYHOUND


12 October 2016

Pumpkin Lush Review

Hello It's 2 Peas In A Pod Blog Here,


Hello everyone and welcome back to our blog, we hope your having a good day. So today's blog post is a lush bath bomb review. As you might already know Lush have brought out their Halloween and Christmas range out to their stores. Well we were super keen and went the day after the Halloween range had been brought out into the Lush stores. Unfortunately we were a week early for the Christmas range however keep your eyes peeled, we might be doing a Christmas shop very soon. 

So as you can see this blog post is the review of the 'pumpkin' bath bomb. We did get the monster ball bath bomb as well oh and iccle baby bot. Without further ado lets get on with the review. 

We was that early that 'Pumpkin' wasn't even registered onto the system yet so we couldn't get the writing on the sticky label, so for this one we will have to go with what the website says. 

Serve yourself up a slab of sweet pumpkin pie, dripping in spice and sauciness - it's even more satisfying in bath bomb form. Sweet, comforting vanilla absolute and spicy cinammon evoke the rich, biscuity fragrance of home-baking and stacked desserts, ensuring that you feel toasty from top to toe. A soak with this pumpkin-shaped bomb is more satisfying than a belly full of pudding.

Firstly once you pop it into your warm bath it fizzes straight away letting bursts of orange dance into your water. It's very magical and it feels so cozy, and Halloweeny aswell. However we must say it doesn't smell much like pumpkin pie, very much more like oranges. Which don't get us wrong is a nice scent and it lasts very long on your skin but we was expecting a pumpkin scent. The pumpkin face was super cute and added a nice touch. We hadn't seen this bath bomb before so we think this might be a new addition. 

This bath bomb would be great to use on the night of Halloween just before you go trick or treating or maybe a Halloween party. It would also make a nice gift as it very pleasing to look at and also it smells really nice. If you're expecting it to smell of oranges then it won't be a dissapointment. Not saying the bath bomb was a dissapointment because it wasn't it left the skin feeling soft and made it smell devine. It also lingered for a long time too. Just bare in mind it doesn't smell of pumpkin. The pictures on our blog don't give the bath bomb justice, it was a lot more pigmented and turned the bath water bright orange and held its colour for the whole duration of the bath.  We would recommend this bath product to anyone who is looking into trying some lush Halloween products as its not to in your face it's very subtle. Which is quite nice once in a while. 

Thank you for thaking the time out of your day to read this blog post, we hope you have enjoyed it. If you would like us to review some more lush product, as we know our most viewed blog post is a lust review then comment down below or contact us on Twitter. What's your favourite lush product at Halloween? Our favourite has to be either this or the monsters ball, loved it. Have you entered our latest giveaway yet? Of not then make sure to enter it Here Good luck! 


Please Share The Pea Pod Love,

Thank You,

Jade & Lydia Xx

Where To Find Us: 

Click The Usernames For Direct Links 

Blog Accounts:
Twitter: 2peasinapodblog
Email: twopeasinapodblog@gmail.com

Jade: 
Twitter:   Dewey_bear

Lydia:
Twitter:  Lydia_Greyhound 
Instagram:   LYDIA_GREYHOUND


29 October 2015

Making Pumpkin Cupcakes

Hello 2 Peas In A Pod Blog Here!

Hello, today's blogpost is from Lydia although it's something we did together. This is the following blog post from Tuesday, as this is the recipe for the inside of the pumpkins we carved. This is a simple recipe to do, and the cakes taste very nice even if they don't look it!

Here is the recipe for the main cakes:
280g Plain flour
1 teaspoon ground cinnamon
1/2 teaspoon ground nutmeg
1/2 teaspoon ground ginger
1/2 teaspoon ground cloves
1/2 teaspoon salt
1 tablespoon baking powder
1/2 teaspoon bicarbonate soda
110g butter
200g caster sugar
5 tablespoons brown soft sugar
2 eggs
180ml milk
250g pumpkin (we used our own, after carving the pumpkins. It is also best to blend it unless you have purè)
Cake cases

Here is what you need for the icing:
100g Icing sugar
Marshmallows
Food colouring


The first thing you need to do is measure out all the ingredients that you are going to need, these are all the ingredients for making the cakes, all measured out accurately. You also have to put the cake cases into the tins for the cakes to be cooked in.

Once you have done that you then need to get a big bowl and out all the dry ingredients in which are: the plain flour, ground cinnamon, ground nutmeg, ground ginger, ground cloves, salt, baking powder, bicarbonate soda. Once you have put these into a bowl you have to mix them together and make sure it is mixed properly.


After you have mixed them together you have to add the butter and caster sugar and mix that in well with theonther ingredients, there should be no lumps of butter in it. You then have to add the eggs and milk into the mixture and make sure it has all been mixed in.

Once that has been mixed in you have to make sure that the pumpkin has no seeds lift in it and that it has been blended so it is less stringy, and mix it in.

You then have to put the mixture in the cake cases and put them in the oven at around 180° and leave them to cook for 20 mins, if they need extra time then leave them in a bit longer.

Whilst the cakes are in the oven you can start with the icing and decoration that will go onto the cakes. For the marshmallows we drew faces on them with black icing, we then mixed the icing sugar and water together an put green food colouring I it to make it look more spooky.

Once the cakes were out of the oven and fully cooled we put the icing and marshmallows on the cakes, we ate one each and they tasted very nice.

I hope you enjoyed this blog post and it has maybe given you an idea of something delicious you can make for a Halloween treat.hope you liked this post and thank you for reading.

If you are not already following us on Bloglovin' we would really appreciate it if you did as we are trying to reach 100 followers by the end of the year so please help us with our goal. We also follow back so just comment below if you have followed us and we will follow you back. Just find the Bloglovin' button at the top left of our blog page!

Please share the pea pod love ! 

Thank you !! 

Lydia Xx

Where to find us : 

Joint Accounts: 
Twitter: 2peasinapodblog 
Email for any enquiries: twopeasinapodblog@gmail.com

Jade: 
Twitter: Dewey_bear 
Instagram: THE_PERKS_OF_BEING_JADE 

Lydia: 
Twitter: Lydia_Greyhound
Instagram: Lydia_Greyhound

27 October 2015

Pumpkin Carving 2015

Hello Its 2 Peas In A Pod Blog Here,

Today's blog post is by Jade but both myself and Lydia carved the pumpkins. We've just started our half term and it's Halloween this Saturday coming, so we thought what better way to get in the Halloween spirit than to carve pumpkins. Plus it's a great blog post idea. 


So firstly we went to our local supermarket which was Tesco and we purchased 2 pumpkins both were £1.50. 

When carving pumpkins there are 5 essentials that are a must do: 

1) Bowl- to put the pumpkin seeds in
2) Tongs/ spoon- to pick up the inside 
3) Pen- to draw an outline 
4) Sharp Knife- to cut the pumpkin 
5) A Carving Set- to get a better cut on the pumpkin (ours was from sainsburys) 

It's best off to draw a sketch on the pumpkin so you don't mess up when your actually cutting it. The top left corner was Lydia's pumpkin you can't really see it because she used a pencil. I used a pen and I really liked the idea of stars as the eyes. 


These were our final products. I really enjoyed carving them and loved how they both turned out. We cleared out the whole inside by scraping the inside with a metal spoon. We then got a tealight and set it alight with a match and it's looks all grousome. These look great outside your door on Halloween. Such a festive tradition. 

I hope you have enjoyed the blog post. Stay tuned to our blog this week as we have re-used the inside of our pumpkins and have incorporated them in a baking blog post! So keep and eye out for that. Thank you for reading it and please shared the Halloween love around !!

If you are not already following us on Bloglovin' we would really appreciate it if you did as we are trying to reach 100 followers by the end of the year so please help us with our goal. We also follow back so just comment below if you have followed us and we will follow you back. Just find the Bloglovin' button at the top left of our blog page!

Please share the pea pod love ! 

Thank you !! 

Jade Xx

Where to find us : 

Joint Accounts: 
Twitter: 2peasinapodblog 
Email for any enquiries: twopeasinapodblog@gmail.com

Jade: 
Twitter: Dewey_bear 
Instagram: THE_PERKS_OF_BEING_JADE 

Lydia: 
Twitter: Lydia_Greyhound
Instagram: Lydia_Greyhound


BLOG DESIGNED BY PRETTYWILDTHINGS