Showing posts with label baking. Show all posts

4 April 2019

Chocolate Easter Egg Nests


Chocolate Easter Egg Nests


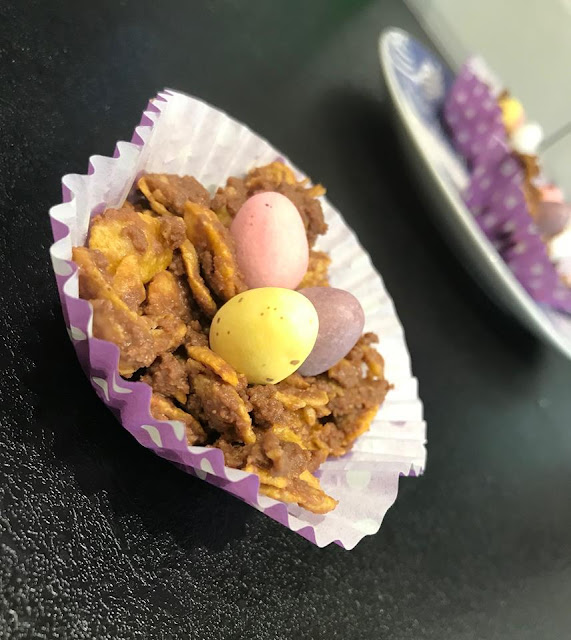
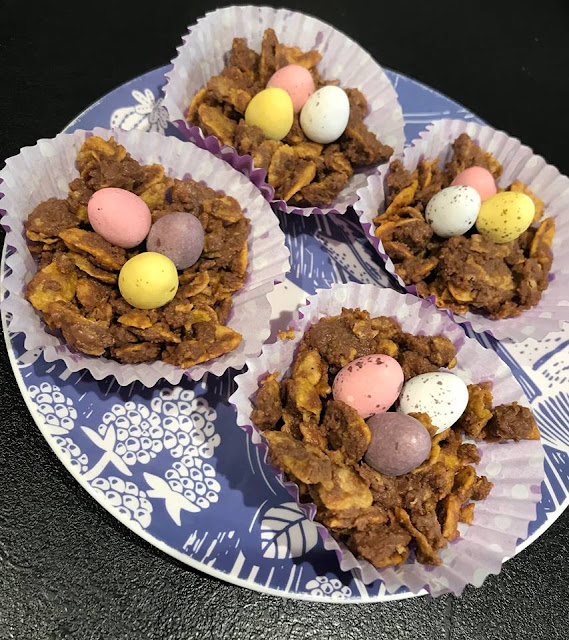
Its almost Easter, and the shops have been selling Easter eggs for months, this has not helped my love for chocolate at all-hahah! One of my favourite chocolates around Easter is Mini Eggs, they are amazing, anyway, I wanted to do an easter bakes and I thought I would incorporate my favourite easter chocolate. So, I am doing chocolate Easter egg nests!

For the chocolate Easter egg nests, you will need;

12 hole fairy cake tin
Cupcake cases
225g plain chocolate, broken into pieces
2tbsp golden syrup
50g butter
75g cornflakes
36 mini chocolate eggs

Chocolate Easter Egg Nests


 How to make the nests;

Firstly, line a 12-hole fairy cake tin with the cupcake cases.

Then melt the chocolate, golden syrup and butter in a bowl set over a pan of simmering water (try not to let the base of the bowl touch the water). Stir the mixture until smooth. Alternately if don't want to melt the chocolate you can use a microwave.

Remove the bowl from the heat and gently stir in the cornflakes until all of the cereal is coated in the chocolate. If you don't want to use cornflakes, you can use shredded wheat or Rice Krispies.

Divide the mixture between the paper cases and press 3 chocolate mini eggs into the centre of each nest.

The last step is to leave the nests to chill in the fridge for 1 hour, or until they are completely set.

Chocolate Easter Egg Nests


Once they are set you can then enjoy the fantastic treat you've just made! I absolutely love making these, as they are so simple but so great. I love how simple and quick they are to make!

Thank You,

Lydia 

Where To Find Us: 

Click The Usernames For Direct Links 

Blog Accounts:
Twitter: 2peasinapodblog
Email: twopeasinapodblog@gmail.com

Jade: 

Lydia:
Instagram:   LYDIA_GREYHOUND
17 December 2018

Christmas Pudding Cupcakes


There is something special about baking at christmas and as you will all know Lydia and I love to bake together. So, when we saw this cupcake recipe we knew we had to try it out. We did change the recipe to be chocolate orange favour though. I mean as you can see we did have a bit of a fail. However, I can confirm my Grandad did say they tasted really good and were one of the best bakes we'd ever made! It's the inside that counts, maybe Mary Berry might not approver but we do! Yum!


Ingredients: 
  • 150 g self-raising flour
  • 30 g cocoa powder
  • 175 g caster sugar
  • 175 g soft margarine 
  • 3 large eggs
  • 3 tsp orange extract
  • 75 g milk chocolate 
  • ½ tbsp milk
  • 12 cupcake cases
  • 4 Ounces white chocolate 
  • 1/2 cup of double cream
  • Rasberries 
  • Leaf


Method: 

1. Pre-heat the oven to 190C - Gas mark 5
2. Put your cupcake cases into a muffin tin.
3. Grate the milk chocolate 
4. Put all of the ingredients into a large bowl (self-raising flour, cocoa powder, caster sugar, large eggs, soft margarine,orange extract,milk and the grated chocolate) mix on a low speed until fully combined.
5. Divide the mixture evenly between the 12 cupcake cases
6. Put the tin into the oven and cook the cupcakes for 20-25 minutes. After 20 minutes put a skewer in the middle and check if it comes out clean. If it does they’re done, if not pop them back in for a couple more minutes and check again.


7. Once cooked, remove the cupcakes from the oven and leave them to cool in the tins for a few minutes.
8. Remove the cupcakes from their tin and pop them onto a wire rack to cool completely, removing the cases. 
9. Whilst the cakes are cooling begin to make the drip icing.
10. Put both the white chocolate (grated) and the cream in the microwave for 1 minute.
11. Then leave to stand for 5 minutes then whisk together. 
12. Drip it onto of the cupcakes (turing them upside down).
13. After that place your leaf on top alongside the raspberry! 


Viola!! Done! I hope you enjoyed making these cupcakes and if you did tweet us a picture! I bet they look better than ours! I do think chocolate orange cupcakes are my new thing now! Yummy. Hope you all have a festive few weeks leading up to Christmas!

Thank You,

Jade 

Where To Find Us: 
Click The Usernames For Direct Links 
Blog Accounts:
Twitter: 2peasinapodblog
Email: twopeasinapodblog@gmail.com

Jade: 

Lydia:
Instagram:   LYDIA_GREYHOUND


16 October 2018

Halloween Inspired Cookie Cake


With Halloween lurking around the corner we thought it would be apt to create a Halloween inspired recipe! Two of our favourite foods are cookies and cakes! So why not mash them together? We have a recipe for a cookie cake!


To begin with, you are better off to weigh out all your ingredients. You will need:


  • 12 Tablespoons butter, melted
  • 1 cup brown sugar, packed
  • 1 large egg
  • 1 egg yolk
  • 2 teaspoons vanilla extract
  • 2¼ cup all-purpose flour
  • ½ teaspoon salt
  • ½ teaspoon baking soda
  • ½ cup mini chocolate chips + more


For the icing: 
  •  4 Tablespoons of butter     
  •  5 Tablespoons of icing sugar
  •  2 teaspoons of vanilla extract
  •  3 teaspoons of orange food dye
  •  Halloween decorations


After you have weighed out your ingredients, preheat oven to 200 degrees. 

Then line a 12-inch pizza pan with greased parchment paper. Set aside.


In a large bowl cream together melted butter and brown sugar. 

After that mix in eggs and vanilla extract.

In a separate bowl whisk together flour, salt and baking soda.


Then add dry ingredients to wet ingredients, stirring until a soft dough forms.

Fold in mini chocolate chips and pop the dough into the pan.

Bake for 13-15 minutes. (do not over bake. Remember cookie will continue to cook as it cools)


Let cookie cool on pan until completely cooled... to which by the pictures we did not do!! This part of the recipe is crucial! But, were going to roll with it and say it is all gooey to look spooky. 

Whilst the cake is cooling, mix the icing ingredients together and decorate your cake as desired. 


This cake can be for any time of the year! However you would like to decorate it, is how the cake will fit with your festivities!! Hope you liked this recipie! What is your staple Halloween baking recipie? 


Thank You,

Jade & Lydia 

Where To Find Us: 

Click The Usernames For Direct Links 

Blog Accounts:
Twitter: 2peasinapodblog
Email: twopeasinapodblog@gmail.com

Jade: 

Lydia:

Instagram:   LYDIA_GREYHOUND


17 July 2018

Bourbon Biscuit Brownie Recipe

Hello It's 2 Peas In A Pod Blog Here!


Hello everybody, welcome back to our blog. How is your day going? Today's blog post is by Lydia and as you can see from the title, this post is a recipe! We haven't done a recipe on the blog for a while, so, I thought I would do a recipe. This isn't my own recipe, it's one I found on Olive Magazine, but I wanted to try it as they sounded really good and they are! This recipe is for Bourbon Biscuit Brownies, they are delicious, plus really easy to make. They combine 2 of my favourite sweet treats Bourbon biscuits and brownies. Anyway, let's continue with the recipe!


Ingredients:
15 Bourbon Biscuits,
100g Butter,
200g Dark Chocolate,
4 Eggs,
250g Caster Sugar,
100g Plain Flour,
1 tsp Baking Powder,
30g Cocoa Powder,

Method:
1. Heat the oven to 180°C (Gas Mark 4). Line a 20x30cm rectangular brownie tin with baking parchment.
2. Keep 5 of the bourbon biscuits for decoration, and use a sharp knife to cut them down the middle and separate the 2 sides. I then left them just as the sides to decorate the brownies. Roughly chop the rest of the bourbon biscuits into chunky bits.
3. Melt the butter and chocolate together in a microwave or in a bowl set over a pan of simmering water, then cool to room temperature.
4. Whisk the eggs and sugar together with an electric whisk until the mixture is pale, has doubled in volume and leaves a trail when you pull the whisk out.
5. Fold the chocolate mixture into the egg mixture then sift in the flour, baking powder and cocoa powder. Fold this in then stir in the chopped bourbon biscuit pieces. Spoon into the tin and smooth down.
6. Scatter over the reserved bourbon biscuit bits, however, I just placed them on as 10 bits.
7. Bake for 25 minutes or until the top is shiny and the middle just set. Cool completely then lift out of the tin and cut into squares.
8. Serve and enjoy.


So, that's the end of the recipe. I have to say these brownies are some of the best I've made! They are delicious too. If you like brownies and/or bourbon biscuits this is a recipe you should try, they are amazing! If you do try this recipe, we'd love to see them! Thank you for reading and I hope you enjoyed reading!

Please Share The Pea Pod Love,

Thank You,

Lydia Xx

Where To Find Us: 

Click The Usernames For Direct Links 

Blog Accounts:
Twitter: 2peasinapodblog
Email: twopeasinapodblog@gmail.com

Jade: 
Twitter:   Dewey_bear

Lydia:
Twitter:  Lydia_Greyhound 
Instagram:   LYDIA_GREYHOUND

26 March 2018

Easter Bakes

Hello It's 2 Peas In A Pod Blog Here,


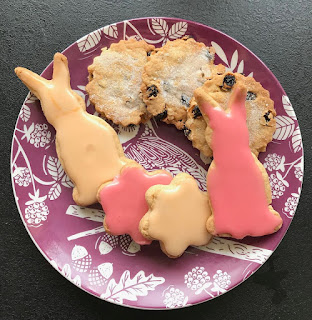
Hello everyone! Welcome back to our blog. How are you today? Today's blog post is by Lydia and is a baking blog post. Easter is this weekend and what better way to celebrate it than with an Easter baking recipe. In this baking blog post, I'll be doing a biscuit recipe. So, lets get on with the recipe.

Ingredients:

For the dough;

  • 200g softened butter
  • 150g caster sugar
  • 2 large egg yolk
  • 400g plain flour
  • 1 level tsp mixed spice
  • 1 level tsp cinnamon
  • 2-4 tbsp milk
For the currant biscuits;
  • 100g currants
  • a little caster sugar, for sprinkling
For the iced biscuits;
  • 1-2 tsp lemon juice
  • 250g icing sugar
  • about 2 tbsp cold water
  • different coloured food colouring
Method:
  1. Preheat oven to 180°C (Gas Mark 4). Lightly grease two baking trays lined with baking parchment.
  2. Measure the butter and sugar into a bowl and beat together until light and fluffy. Beat in the egg yolk. Sieve in the flour and spices and add enough milk to give a fairly soft dough. Bring together, using your hands, to make a soft dough.
  3. Half the dough and set half to one side.
  4. For the currant biscuits, add the curents to the remaining half of the mixture and kneed it lightly on a floured work surface. Roll out to a thickness of about 5mm. Cut into circles using a circular cutter. Place on the prepared baking tray and sprinkle with caster sugar.
  5. Bake in the preheated oven for 15 minutes, or until pale golden-brown. Sprinkle caster sugar and lift onto a wire rack to cool.
  6. For the iced biscuits, kneed the remaining half of the biscuit dough mixture lightly on a floured worksurface. Roll out to a thickness of about 5mm. Cut out Easter biscuits using different shaped cutters, I used rabbits and flower shaped cutters.
  7. Lightly grease two baking trays lined with baking parchment.
  8. Place the biscuit shapes on the prepared baking trays and bake in the preheated oven for 10-15 minutes. Remove from the oven and lift onto a wire rack to cool.
  9. To make the icing, mix the lemon juice with the icing sugar and then add about two tabloespoons of water, adding it little by little until you have a relatively stiff but smooth icing.
  10. Divide the icing into separate bowls and mix in food colourings of your choice into the separate bowls of icing, until the ideal shade is achieved.
  11. Use the icing you've made to decorate the biscuits.
Enjoy your biscuits!


So, that's the end of this blog post, I hope you've enjoyed reading and it has inspired you to do your own Easter baking. This recipe makes really good biscuits, both the currants biscuits and the iced biscuits! Thank you for reading and I hope you enjoyed reading!

Lydia Xx

Where To Find Us: 

Click The Usernames For Direct Links 

Blog Accounts:
Twitter: 2peasinapodblog
Email: twopeasinapodblog@gmail.com

Jade: 
Twitter:   Dewey_bear

Lydia:
Twitter:  Lydia_Greyhound 
Instagram:   LYDIA_GREYHOUND

20 February 2018

Golden Syrup Flapjack Recipe

Hello It's 2 Peas In A Pod Blog Here,


Hello everyone, welcome back to our blog! How are you today? As you can tell by the title of this blog post, this is a recipe. We haven't done a recipe on our blog for a while, so, we thought we would do a flapjack recipe. This flapjack recipe isn't our own, it's a Jamie Oliver recipe, but it makes great flapjacks and is so easy to make! So, lets get on with the recipe.

Ingredients:

150g butter,
75g light brown soft sugar,
3 rounded tbsp golden syrup,
250g rolled oats (porridge oats).


Method:

1. Preheat the oven to 180°C (160°C) gas mark 4. Grease and line a shallow 20cm square tin with parchment or grease proof paper.

2. Put the butter, sugar and golden syrup into a medium pan and gently heat until melted.

3. Once it's all melted, add the oats and stir them until all oats are covered.

4. Then put the mixture into the tin, level and press the mixture evenly and firmly with the back of a spoon.

5. Bake for 25 minutes, or until golden around the edges. Once cooked, remove from the oven and cool for 10 minutes, then mark into 12 (or however many slices you want, I did my bigger than what the recipe says) whilst still warm.

6. Cool the flapjacks completely before turning out onto a board and cutting again with a sharp knife.


Then it's time to enjoy the flapjacks!


So, that's the end of this recipe. We hope you enjoyed this blog post! This is a really good recipe, it makes lovely flapjacks, the flapjacks will keep up to a week in an air tight container. If you decide to follow this recipe, we would love to see your results by tweeting us a picture. Thank you for reading this blog post and we hope you enjoyed reading!

Please Share The Pea Pod Love,

Thank You,

Jade & Lydia Xx

Where To Find Us: 

Click The Usernames For Direct Links 

Blog Accounts:
Twitter: 2peasinapodblog
Email: twopeasinapodblog@gmail.com

Jade: 
Twitter:   Dewey_bear

Lydia:
Twitter:  Lydia_Greyhound 
Instagram:   LYDIA_GREYHOUND

19 December 2017

DIY: Mini Christmas Garland

Hello, It's 2 Peas In A Pod Blog Here,

Hello, everyone, it is Jade here, as you will all know, it is pretty much festive x100 over here at our blog. I mean I am not moaning because I absolutely love Christmas. This year I decided I wanted to get a bit more hands-on and create some decorations of my own. So, I decided to create a mini garland for my bedroom. I have a tiny bedroom so a mini one fitted perfectly. Other than apple spice I think cinnamon and orange is a classic Christmas scent. So I decided to combine the two into a festive garland


So without further ado let's get on with the blog post, 

Tools You Will Need: 
-Oven
-Sharp Knife
-Screw Driver
-Sellotape 
-Scissors
-Teatowel
-Tweezers
-Baking Tray
-Festive Ribbon
-White String
-5 Oranges
-10 Cinnamon Sticks

The first step is to dry out the oranges. I must say the kitchen smelt so cosy when I was doing this step. 

1. Pre-heat your oven to 110C. 

2. Using a sharp knife slice your oranges, I would say on average I got about 6 slices per orange. I just used the easy peelers from Co-Op.

3. With all the slices including the end pieces, place them on a tea towel and cover them with the other half of the tea towel. Once you have done that press firmly on the tea towel to squeeze the juice out of the slices.

4. After that place them onto an oven tray and place them into the oven for about 2-3 hours. Every 30 mins turn each slice over to they are evenly dried out.

5. Once the 2-3 hours are up and the orange slices are fully dried up, then it is time to construct the garland.

6. Grab your string and put sellotape on the end. This is to make it easier to thread through the cinnamon sticks.


7. I began the garland with a cinnamon stick. To create the hole I used a pointed screwdriver.  I pressed the point into the middle of the cinnamon stick firmly so it went through to the other side. I was careful not to break the whole stick.

8. Using the string with the sellotape on the end thread it through, to make it easier to get it from the other side I used tweezers to grab it and pull it through.

9. I then placed one orange peel through the string next to the cinnamon stick. The string should go through the orange peel fairly easily.

10. I then repeated steps 7-9. Although I did 2 orange peels then the next one I did 3. After that, I went back to 1 orange peel. So it would create a pattern of 1,2,3.

11. Once you have finished your garland cut the other end of the string. I then tied the two ends together to create a circle. The garland is one big circle and I hang it on my bedpost. My room smells so good.

12. I then tied 4 festive ribbons in various different places on the circle. I liked that final touch because it made it homely.


Well, that is the end of this blog post. I hope you enjoyed it and if you plan to create your own then I hope you have fun creating it. I am happy with how mine turned out. Thank you for taking the time to read this blog post and I hope you all have an amazing Christmas and cherish all the memories. We will not be posting on our blog until the new year, so have an amazing new year and I hope 2018 brings you joy.

Please Share The Pea Pod Love,

Thank You,

Jade Xx

Where To Find Us: 

Click The Usernames For Direct Links 
Blog Accounts:
Twitter: 2peasinapodblog
Email: twopeasinapodblog@gmail.com

Jade: 
Twitter:   Dewey_bear

Lydia:
Twitter:  Lydia_Greyhound 
Instagram:   LYDIA_GREYHOUND


6 December 2017

Terry's Chocolate Orange Cookies

Hello It's 2 Peas In A Pod Blog Here,


Hello everybody, welcome back to our blog! How are you all today? Today's blog post is by Lydia, and as you can tell by the title it's a baking blog post! It's getting closer and closer to Christmas, and as it's near that time of the year, we have a festive recipe blog post for you here. Both Jade and I love a chocolate orange, we always have them around this time of year. Especially when we get them as gifts at Christmas. I love watching a Christmas film and sharing a chocolate orange with my family of an evening in the countdown to Christmas. So, we made some chocolate orange cookies, and here's how we made them!

Ingredients;
  1. 110g Unsalted Butter, softened,
  2. 200g Light Brown Sugar,
  3. 1 Large Free-range Egg,
  4. 1 Teaspoon Vanilla Extract,
  5. 165g Plain Flour,
  6. Pinch of Salt,
  7. 1/2 Teaspoon Baking Powder,
  8. 1/2 Teaspoon Bicarbonate of Soda,
  9. 30g Cocoa Powder,
  10. Terry's Chocolate Orange .
Method;
  1. Preheat oven to 190°C (Gas Mark 5). Line two large baking trays with Parchment paper.
  2. Cream the butter, sugar and vanilla together until light and fluffy. Add the egg and beat until incorporated,
  3. Add the flour, pinch of salt, baking powder, bicarbonate of soda and cocoa powder, mix until a dough comes together.
  4. Divide the mixture into balls. Spread out evenly on the baking trays.
  5. Put a segment of the chocolate orange on each ball of dough.
  6. Bake in the preheated oven for 10-12 minutes, until spread out and crackling on top. 
  7. Once cooked, allow the cookies to cool on the trays for 5 minutes - in this time the cookies will harden a bit to make them easier to move. Finish cooling on a wire rack.
  8. Once cooled, enjoy the delicious cookies.


So, that's the end of the blog post. I hope you enjoyed reading, this recipe makes such nice cookies! If you don't like chocolate oranges then you can use the same recipe but change the chocolate orange to a chocolate of your choice. These cookies were delicious! We also made different cookies using the same recipe just had the small pieces of terry's chocolate orange mixed into the mixture. They were both just as nice. If you make these cookies we would love to see them! Thank you again for reading, I hope you enjoyed reading.


Please Share The Pea Pod Love,

Thank You,

Lydia Xx

Where To Find Us: 

Click The Usernames For Direct Links 

Blog Accounts:
Twitter: 2peasinapodblog
Email: twopeasinapodblog@gmail.com

Jade: 
Twitter:   Dewey_bear

Lydia:
Twitter:  Lydia_Greyhound 
Instagram:   LYDIA_GREYHOUND

3 October 2017

Monster Brownies

Hello, It's 2 Peas In A Pod Blog Here!


Hello Everyone! Welcome back to our blog. Today's blog post is by Lydia and is a recipe! September flew by and now we're in October, and as we are, it's only right for there to be a Halloween baking blog post here on our blog! I made these 'Monster Brownies' the recipe is essentially a normal brownie recipe, just the decoration on them makes them perfect for a Halloween party! So, lets get on with this blog post.


Ingredients:
  • 185g unsalted butter,
  • 185g dark chocolate,
  • 85g plain flour,
  • 40g cocoa powder,
  • 50g white chocolate,
  • 50g milk chocolate,
  • 3 large eggs,
  • 275g caster sugar.
Decoration Ingredients:
  • White chocolate,
  • Edible eyes.
Method:
  1. Cut 185g unsalted butter into small cubes and put into a medium bowl. Break 185g dark chocolate into small pieces and put into same bowl.
  2. Fill a small saucepan (Quarter full) with hot water, put bowl on top so it rests on the rim of the pan. Put on a low heat until butter and chocolate have melted, stirring occasionally. Remove bowl from pan. Leave the melted mixture to cool to room temperature.
  3. Turn the oven on to 160°C (Gas mark 4), and grease and line your tin.
  4. Tip 85g plain flour and 40g cocoa powder into a sieve held over a medium bowl, make sure to get rid of any lumps.
  5. Chop 50g white chocolate and 50g milk chocolate into chunks on a board.
  6. Break 3 large eggs into a large bowl and tip in 275g caster sugar. With an electric mixer on maximum speed whisk the eggs and sugar. They will look thick and creamy. This can take 3-8 minutes, depending on how powerful your mixer is.
  7. Pour the cooled chocolate mixture over the eggy mousse, gently fold together with a rubber spatula, get all of the mixture from the sides by doing a figure of eight, moving the bowl around each time.
  8.  Hold the sieve over the bowl of eggy chocolate mixture and resift the cocoa and flour mixture, shaking the sieve. Gently fold in the powder using the same figure of eight action as before. then stir in the white and milk chocolate chunks until they're dotted throughout.
  9. Pour the mixture into the prepared tin, scraping every bit out of the bowl with the spatula. Make sure the mixture is even, and put in the oven. Set a timer for 25 minutes, when the timer goes off, open the oven and shake the tin, if it wobbles in the middle, its not quite done-so put in back in the oven for a few minutes.
  10. Once the brownie is cooked take out of the oven and leave to cool. Once its cooled then cut the brownie into squares, as many as you like.
  11. Then melt the white chocolate for decoration.  Drizzle the melted white chocolate over the top of the brownies. Then add the eyes. And enjoy! You could add more decorations but I just stuck to the white chocolate and eyes!
Well, that's the end of this blog post! I hope you enjoyed this blog post. Let us know through twitter if you made these! We would love to see them! Thank you for reading.

Please Share The Pea Pod Love,

Thank You,

Lydia Xx

Where To Find Us: 

Click The Usernames For Direct Links 

Blog Accounts:
Twitter: 2peasinapodblog
Email: twopeasinapodblog@gmail.com

Jade: 
Twitter:   Dewey_bear

Lydia:
Twitter:  Lydia_Greyhound 
Instagram:   LYDIA_GREYHOUND

BLOG DESIGNED BY PRETTYWILDTHINGS